From Order to Chaos: mastering randomization with the Bucket technique
A bucket, also called bean bag, is the easiest way to transform an ordered list to a randomised list where you never encounter twice the…
A bucket, also called bean bag, is the easiest way to transform an ordered list to a randomised list where you never encounter twice the same object. In fact, this is almost the most used asset I use in my projects, maybe you should too if it’s not the case yet, let’s dig into the how and why.

Why use it
Let say you have a deck building game: surely you have created some smart way of adding cards to the deck, and at the right moment, you have to decide in which order the cards will be in the deck during the gameplay. Or let say you have a runner, and each part of the path is a prefab you have to instantiate in the scene. Then, you must decide what is the next prefab to instantiate.
There are multiple ways to do it, one of them could be to list the prefabs that can go after another, so you control the design of the path, ensure there is no issue when two prefabs follow one another. Or, if it’s a simple prototype, just choose the prefabs from a list of prefabs. In both situations, you have to get one prefab from the whole list of prefabs, wether it be all of them or a set of them.
The easiest way to do it ?It is by getting a random prefab from this list. Now the random method has two main issues:
- it can give you multiple times the same number but letting away some other, giving a non-linear distribution that can be annoying for the player
- it is not reliable from one platform to another: having some correct randomised values on the unity editor will not be replicable on mobile or console (after all, it is a random value).
That is why a bucket is helpful: it allows you to get exactly one time each number of a list, with a randomized order. This way, all your prefabs will be used once before the player gets another time the same prefab.
Note that if you would like to have multiple times the same prefab, you can use multiple numbers linked to the same prefab, like a weighted list.
How to use it
This tool is extremely simple, there are three phases for a bucket:
- generate
- randomize
- pick
1. Generate
Create a new Bucket and set the number of values you want to get from it. During the creation process, it generates a list from 0 to this number minus one (it’s C# so list indexes start at 0). Use the code below, once you have imported the package (see at the end of the article), for a sample of 25 random numbers.
import FredericRP.BucketGenerator;
// ...
var bucket = new Bucket(25);
2. Randomize
It is done internally: from the generated list, the bucket randomises the order of the list before the first call.
There is no code to do that as it’s automatically done on the creation of the class.
3. Pick
Then, each time you want a randomized number, retrieve it from the bucket, it gives you the current number from the list, takes it out and go to the next one. Simply call the GetNumber method as shown below.
var myRandomNumber = bucket.GetNumber();Those simple steps are shown in the picture below.
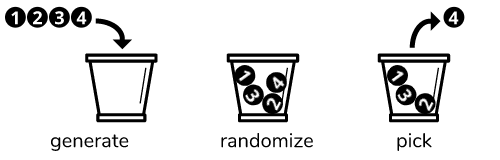
Once all the numbers are given, it starts all over. If specified it during the construction phase, the list is randomized again when the index is reset, so you get the impression it is truly random.
To simplify and optimize the bucket, the list is generated once and we store only the index in the list. Once the index reached the end of the list, it is reset to zero.
Beware that when you reach the end of the list, the random process can make the first item being the same one as the last one from the previous generate phase, so you can have in this particular context twice the same number in a row!
Bucket Generator as a package
Like the others tools I share, this one too is available in a open source package available in the openupm package repository. To import any of the tools I wrote available on OpenUPM, follow the steps below.
1. Add openUPM as a scoped registry in unity
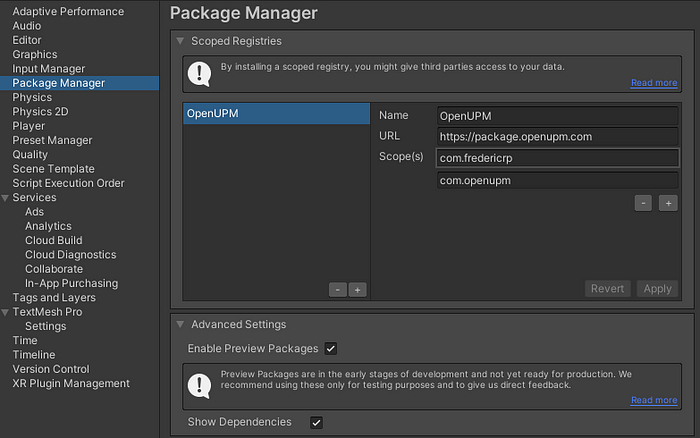
From the project you want to add your package to, go to your project settings, in the section named package manager where you can add a scoped registry.
From the same registry, openUPM, you can add multiple scopes if you find other useful assets there, so be sure to add every scope you want to so Unity will search for them at the right place. Let’s start by adding “com.fredericrp”, then apply.
2. Import the package from the Package Manager
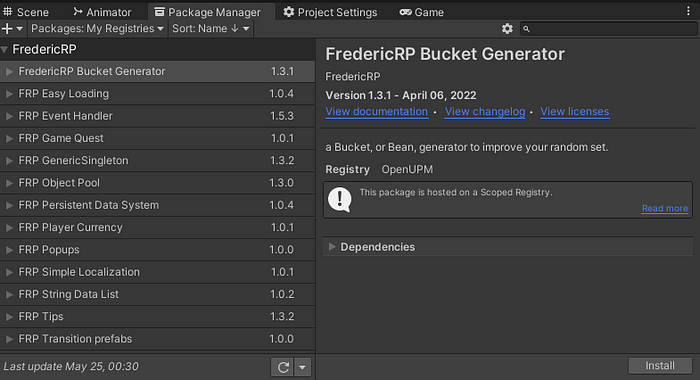
Once it’s done, you will see the matching registries in the unity package manager, under the section “My Registries”: my packages are grouped under the name “FredericRP”. Like any other package, you can install, update and remove the packages directly here, and they will appear under the “Packages” folder of your project.
This is one of the many tools I share on openUPM, follow me to understand and know all the others tools I share and follow my journey with unity!
If you liked this article, I let you applause or comment it, thanks for reading it!